Supabase Backend
Connect your Supabase project to Vibe so the app it builds runs against your actual database, authentication, and storage, not placeholder data.
Supabase credentials are stored in your account's integrations (Administration > Integrations), not inside your Vibe project.
When you link a Supabase project, Vibe builds directly against your real schema and data. The generated app is fully wired to your Supabase backend from the start, so there is no extra configuration step to connect it later.
You don't build tables or write backend logic in Supabase yourself. Describe what you want in your prompts, and Vibe creates and manages the database schema for you.
What you get
When you connect Supabase to Vibe, your project gains:
- Real database access: Vibe builds against your actual tables and relationships, not mock data.
- Authentication: Your app uses Supabase Auth, including any existing users and sign-in flows. Combined with Row Level Security, each signed-in user's own data stays separate from everyone else's, for example, one user's saved work never shows up for another.
- Storage: File uploads and assets connect to your Supabase Storage buckets.
Because Vibe uses your own Supabase credentials, you stay in control of your data and access rules at all times.
Your Publishable Key is safe to use in your app's front-end code only when Row Level Security (RLS) is turned on for your tables, with policies configured to control who can access which rows. Without RLS, that key can expose more of your data than you intend.
Before you begin
If you don't already have a Supabase project, sign up for a free account at supabase.com and create a new project. Then gather these three values:
- Project URL: In your Supabase project dashboard, go to Integrations, then select Data API. On the Overview tab, check the API URL field. It looks like
https://[your-project-ref].supabase.co. You can also find it by clickingConnecton your project dashboard. - Publishable Key: In your Supabase project dashboard, go to Settings, then select API Keys. On the Publishable and secret API keys tab, your key is listed under API Key. It starts with
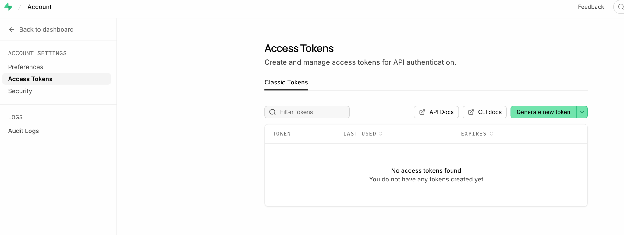
sb_publishable_.... - Personal Access Token: Click your profile avatar in the top-right corner of any Supabase page, then select Account, then Access Tokens. Click
Generate new token, name it, and copy it immediately. Supabase only shows it once.
Connect your Supabase project
Credentials are connected through your account's integrations:
- In Business App, go to Administration.
- Under App settings, select Integrations.
- On the Integrations page, select the AI Tools category in the left sidebar.
- Select Supabase from the list of integrations.
- Click
Connect. - In the Connect Supabase dialog, enter your Project URL, Personal Access Token, and Publishable Key. The connection must include all required fields (including the publishable key) to be treated as connected.
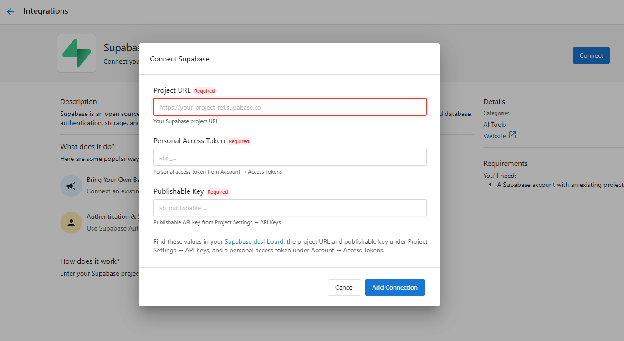
- Click
Add Connection.
Once connected, go to AI > Vibe, open your project, select Settings, then Connectors, and select Enable next to Supabase to start building against your project. If Supabase isn't in the list, select Add connectors to add it first.
Supabase automatically pauses free-tier projects after 7 days of inactivity. If your app suddenly can't reach your database, open your Supabase project dashboard and check whether it needs to be resumed. You can unpause a project from the dashboard within 90 days of it pausing; after that it can't be restored, though your data stays available for download. Upgrading your Supabase project to a paid plan prevents automatic pausing.
Generating a Personal Access Token takes you to your Supabase account's Access Tokens page, where you can see and manage every token you've created.
Secrets and API keys
When your Vibe app needs a Supabase API key, Vibe shows you exactly which secret to add and links directly to the right page in your Supabase dashboard. Your keys go into your project's environment, never into the chat. If a required key is missing, your app surfaces a clear error message instead of failing silently.
Frequently asked questions
Why does Vibe say Supabase is disconnected when it looks connected?
Your Vibe project can end up calling a different Supabase project than the one connected on the account. Confirm both point to the same project. A paused or replaced Supabase project can also cause this mismatch.
Why does chat say Supabase is not connected even though the Supabase connector is enabled?
Enabling the connector is not enough if the account has no credentials. Go to Administration → Integrations and add a Supabase connection for the account.
Can several Vibe apps share one Supabase project? Can I host an app on a URL path like /seo-report/?
Multiple Vibe projects can share one Supabase project, but do not share one project across different companies. Vibe does not host apps on URL paths. Use a subdomain instead, for example seo-report.yourdomain.com.